Export
Export to File
Export Lab Notebooks & Inventory Spaces
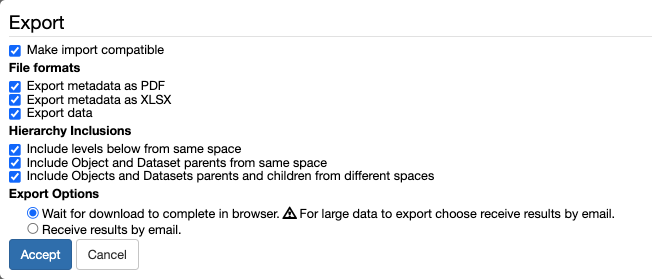
All levels of the Lab Notebook and Inventory can be exported, using the Export option in the More.. drop down, as shown below for a Space.

In each case, the following export options are available:

Make import compatible. If selected, datasets are exported in a data folder and are in a format ready to be uploaded in openBIS using the default eln-lims dropbox; the metadata are exported in a xlsx folder which contains information in a format ready to be uploaded via the openBIS admin UI.
Export metadata as PDF. Metadata are exported in a hierarchy folder that keeps the folder structure of the ELN. At each level, one pdf file for each exported entity is generated.
Export metadata as XLSX. Metadata are exported in one xlsx folder. The folder contains the metadata of all exported entities and the corresponding masterdata in a metadata.xlsx file. If Make import compatible is selected, this file is suitable for re-import in openBIS. If not, the file contains some fields which are not compatible with re-imports. These fields are: PermId of entities, registrator, registration date, modifier, modification date. In addition to the metadata.xlsx file, the xlsx folder might contain additional folders:
a scripts folder, which contains scripts associated with types in the metadata.xlsx file, if these are present;
a data folder which holds the content of large text fields that exceed the size of an Excel cell;
a miscellaneous folder which contain images embedded in text of exported entries, if present.
Export data. The default maximum size of all datasets to be exported is 10GB. This can be configured by a system admin in the AS service.properties file. We recommend to use sftp to download large datasets. If Make import compatible is selected, datasets are exported in a data folder in a format ready to be uploaded in openBIS using the default eln-lims dropbox. If not, the datasets are exported in a hiearchy folder that matches the ELN hierarchy.
Include levels below from same space. If selected, all hierachy levels below the selected entity and belonging to the same Space are exported.
Include Object and Dataset parents from same space. If selected, Object parents and Dataset parents from the same Space are exported. Example: I export Object A, in Experiment A, in Space 1. Object B in Experiment B also in Space 1 is parent of Object A. When this option is selected, Object B is also exported, otherwise it is not.
Include Objects and Datasets parents and children from different spaces. This allows to export Object and Dataset parents and children that belong to a different Space than the Space from where Objects and Datasets are being exported. Example: I export Object A in Space 1, which has parents in Space 2. If this option is selected, the parents in Space 2 are also exported, otherwise they are not.
Wait for download to complete in browser. This is suitable when exporting only metadata or small datasets. When the dowload is ready, a zip file will be available to download from the browser.
Note: ensure that pop-ups are not disabled in your browser.
Receive results by email. If this option is selected, when the export is ready, you will receive an email notification with a download link. Email notification needs to be configured on system level during or after installation, as explained in Configure Data Store Server
We provide below a couple of examples of the export, to clarify how it works.
1. Import-compatible export of a Space selecting all options
We select all options from the export widget, as shown below.
We export a Space called BARILLAC in the Lab Notebook with all its sublevels (see below).
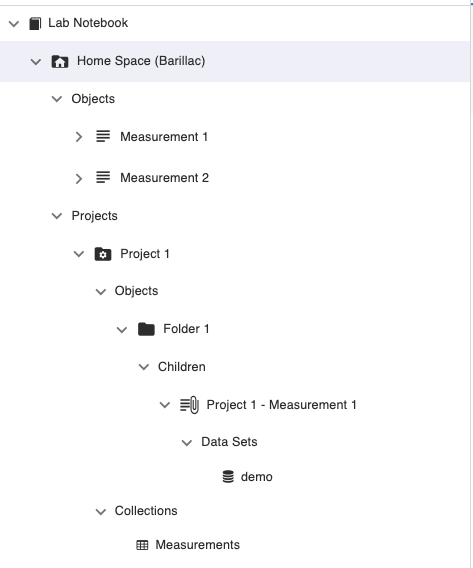
One Object in this Space has a protocol as parent, and this is in the METHODS Space.
The exported zip file contains 3 folders:
A. data folder
This contains the datasets in the correct format to be uploaded via eln-lims dropbox, as shown below.

B. hiearchy folder
This contains folders that match the openBIS hierarchy (Space, Project, Experiment/Collection, Object).
In this case 2 Space folders are present:
BARILLAC: is the exported space.

METHODS: contains a protocol which is parent of a measurement in the Space BARILLAC. This was exported because the option Include Objects and Datasets parents and children from different spaces was selected for export.

Inside each folder, there is a pdf of the corresponding entity. Example:
in the Space folder BARILLAC there is a BARILLAC.pdf file that contains the metadata of the Space;
in the Measurement 1 (ENTRY8) folder there is a Measurement 1 (ENTRY8).pdf file that contains the metadata of this Object;
in the Project folder PROJECT_1 there is a PROJECT_1.pdf file that contains the metadata of the Project;
C. xlsx folder.
This contains:
a metadata.xlsx file which has the metadata of the exported entities and the corresponding masterdata (types and properties) in the correct format to be re-imported in another openBIS instance;

a scripts folder that contains evaluation plugins associated to two types defined in the metadata.xlsx file. This folder is present only if the exported types have plugins associated with them.

a miscellaneous folder that contains images that are embedded in text fields of the exported entities. This folder is present only if exported entities contain images embedded in text.

If the entities you are exporting contain very large txt with more than 32,767 characters (Excel limit for cell size), these are exported separately to a data folder inside the xlsx folder.
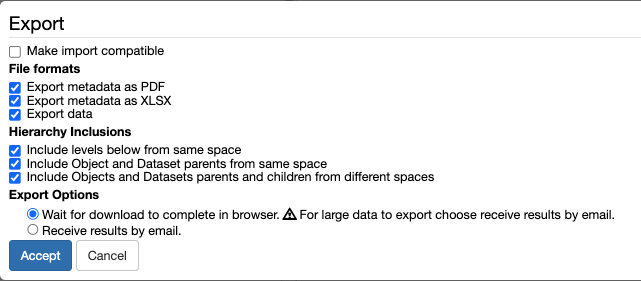
2. Non import-compatible export of a Space selecting all options
We export the same Space as described in Example 1, with all options selected, but the export this time is not import-compatible, as shown below.
In this case the exported .zip file contains only 2 folders: hierarchy and xlsx. Data are exported inside the hierachy folder, instead of being in a separate data folder.
A. hierarchy folder
This contains the same folder structure as described above. In addition, in this case, if an Object or an Experiment/Collection contains a dataset, this is exported in a data folder inside the entity it belongs to.
B. xlsx folder
This contains the same files and folders as described in Example 1. The only difference in this case is that the metadata.xlsx is not import-compatible. It contains some fields which are not compatible with openBIS re-import, as explained above.
Export to Zenodo
openBIS provides an integration with the Zenodo data repository (https://zenodo.org/).
This enables data direct data transfer from openBIS to Zenodo. First of all the connection to Zenodo needs to be configured on system level in the DSS service.properties (see How to configure the openBIS DSS) If this is configured, a lab manager, who has admin rights for the Settings, needs to enable it in the ELN, as explained in Enable Transfer to Data Repositories.
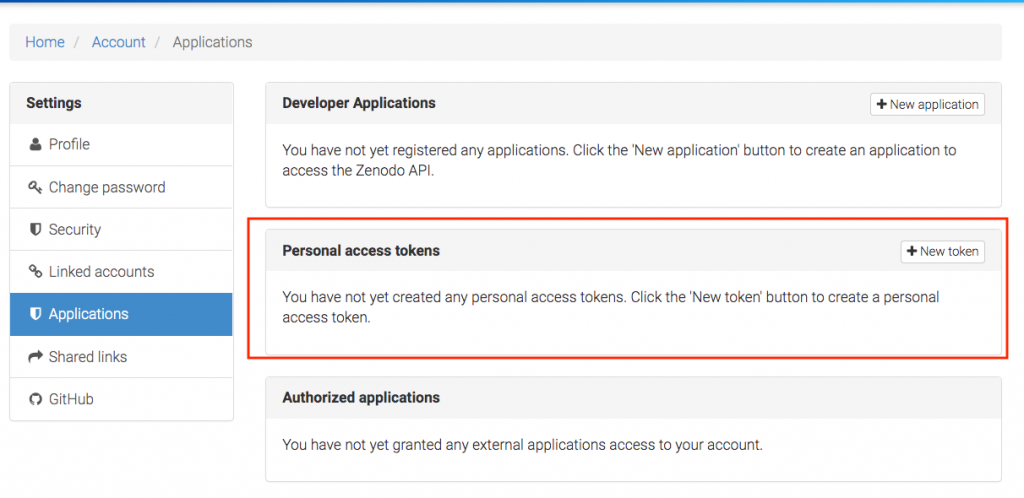
Create Zenodo Personal Access Token
In order to be able to export data to Zenodo, you need a valid Zenodo account. You also need to create a personal access token. This can be done from the Applications under Settings in Zenodo, as shown below:
Save Zenodo Personal Access Token in openBIS
After creating the personal access token in Zenodo, this needs to be stored in openBIS, with the following procedure:
Go to User Profile under Utilities in the main menu, in the Tools tab.
Enable editing.
Add the Zenodo API Token.
Save.

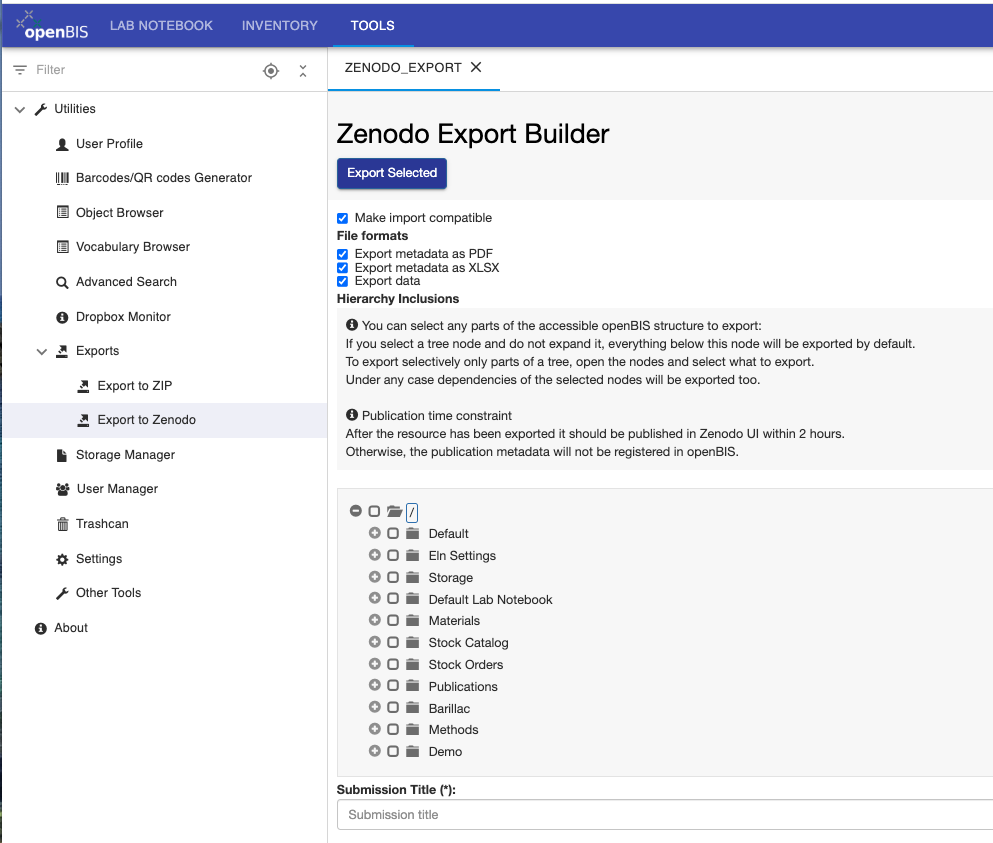
Export data to Zenodo
To export data to Zenodo:
Go to Exports -> Export to Zenodo under Utilities in the main menu, in the Tools tab.
Select the Export options you want to use:
Make import compatible: export can be imported in openBIS.
Export metadata as PDF: metadata of selected entries is exported in pdf files.
Export metadata as XLSX: metadata of selected entries is exported in an xlsx file.
Export data: export datasets.
Select the entities you want to export from the menu.
Enter a Submission Title.
Click Export Selected on top of the export form.
The selected data are transferred as a .zip file to Zenodo. You are now redirected to Zenodo, where you should fill in additional metadata information.
Publish the entry in Zenodo.
After you hit the Publish button in Zenodo, a new entry with the details of this submission will be created in the Publications folder in the Inventory. Please note that this may take a few minutes.
Export data to Zenodo in a multi-group instance
If you export data from a multi-group instance where you have access to more than one group, you need to select the group under which the new publication entry should be created.
In the example below we see 3 group names: GENERAL, ETHRDH, RDM.
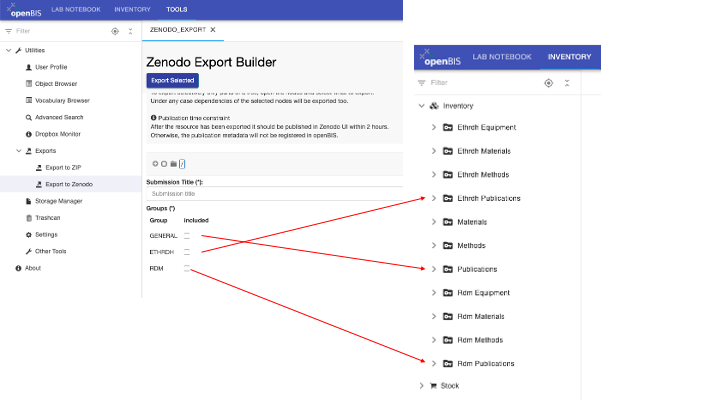
If you select GENERAL, the publication entry will be created under the PUBLICATION Space (if present).
If you select ETHRDH, the publication entry will be created under the ETHRDH_PUBLICATION Space.
If you select RDM, the publication entry will be created under the RDM_PUBLICATION Space.
Export to ETH Research Collection
The ETH Research Collection is a FAIR repository for publications and research data provided by ETH Zurich to its scientists.
Data can be uploaded to the ETH Research Collection only by members of ETH Zurich. This export feature is only available to ETHZ members.
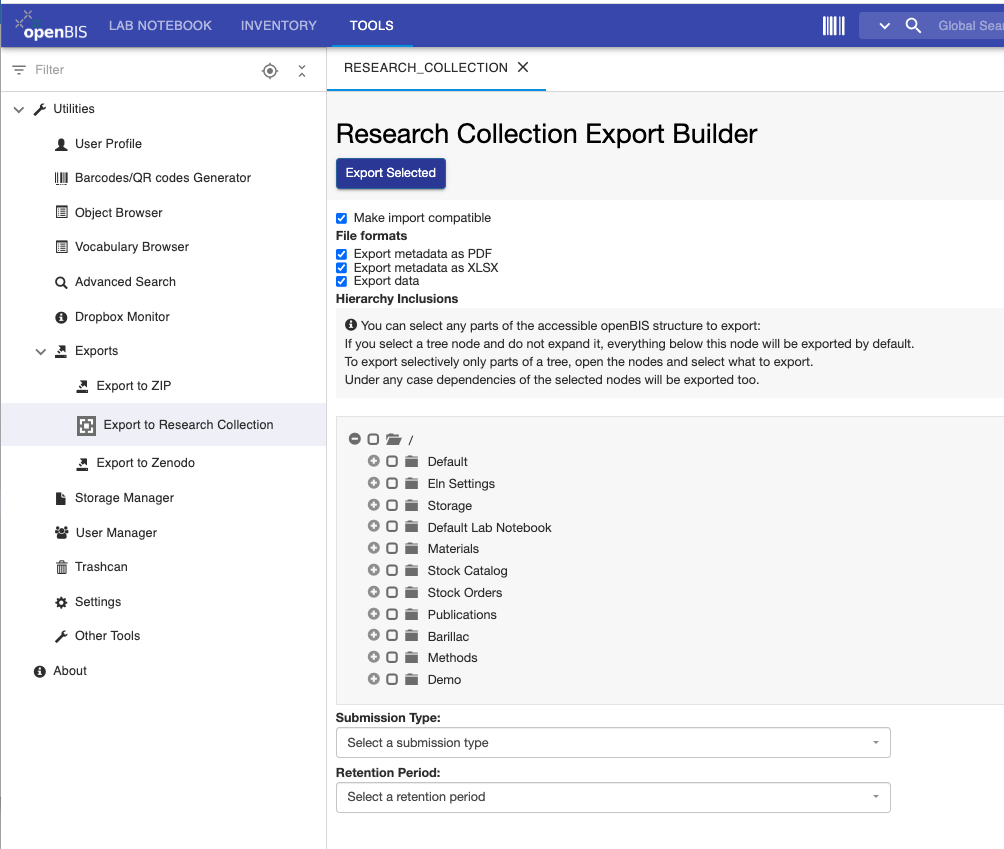
To export data to the ETH Research Collection:
Go to Exports -> Export to Research Collection under Utilities in the main menu, in the Tools tab.
Select the Export options you want to use:
Make import compatible: export is compatible with import in openBIS.
Export metadata as PDF: metadata of selected entries is exported in pdf files.
Export metadata as XLSX: metadata of selected entries is exported in an xlsx file.
Export data: export datasets.
Select what to export from the tree.
Select the Submission Type from the available list: Data collection, Dataset, Image, Model, Sound, Video, Other Research Data.
Select the Retention Period that will be used in the ETH Research Collection: 10 years, 15 years, indefinite. This is time for which the data will be preserved in the Research Collection.
Click the Export Selected button on top of the page.
The selected data are transferred as .zip file to the ETH Research Collection. You will be redirected to the ETH Research Collection and will need to complete the submission process there.
A new entry with the details of this submission will be created in the Publications folder in the Inventory after the submission process in complete. This may take a few minutes.
The size limit for one single export to the ETH Research Collection is 10GB.
Export data to the ETH Research Collection in a multi-group instance
If you export data from a multi-group instance where you have access to more than one group, you need to select the group under which the new publication entry should be created. See explanation in section Export data to Zenodo in a multi-group instance above.